You can deploy your OpenXava
applications in any Java application server with support for Servlet 3.1
or better. For this guide we're going to use Apache Tomcat to deploy your
OpenXava application. Tomcat is the most used and robust Java application
server, ideal for production environments.
Download and install Tomcat
Download Tomcat 9
from Apache. OpenXava also works fine with Tomcat 8 and Tomcat 10.
Uncompress Tomcat in a folder of your choice. Go to the
webapps
folder and remove all the folders inside:
docs, examples,
host-manager, manager and
ROOT. They are example and
management apps that you don't want to have in a production system.
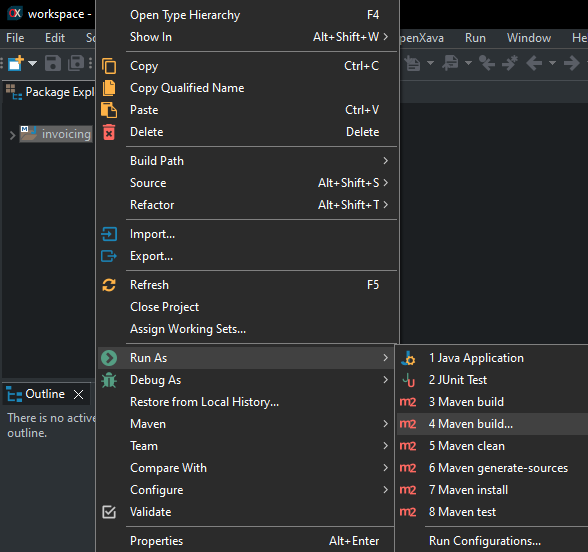
Create and deploy the WAR
In order to deploy your application into Tomcat you have to create a WAR
file from your project. For that, click on right mouse button on your
project and choose Run As > Maven build...:
In the dialog type package
as goal:

Additionally, you can put a better
name like invoicing package in this case. Click on Run.
Wait until the the execution finishes.
Or if you have Maven installed in
your computer and you prefer to use command line:
$ cd invoicing
$ mvn package
Afterwards get the file
invoicing.war (or y
ourapplicationname.war)
from
target folder in your project and copy it to the
webapps
folder of your Tomcat. Your application is already deployed. Warning! For
Tomcat 10 you have to create a folder called
webapps-javaee inside
Tomcat 10 folder and then copy the war file to that folder instead of
webapps.
Run Tomcat
To
start your Tomcat, with Windows click on the Start
button, type cmd and
press ENTER, then::
set JAVA_HOME=C:\Program Files\Java\jdk-11.0.3
cd tomcat-9.0.64\bin
startup
With Linux/Mac:
export JAVA_HOME=/usr/lib/jvm/java-11-openjdk
cd tomcat-9.0.64/bin
./startup.sh
Of course, adjust the URLs for
your own Tomcat and Java directories.
Congratulations! Your
application is already running in production, just use your browser to
access to it.
Configure against production database
By default your application goes against the same database you're using in
development, the one defined in the datasource from src/main/webapp/META-INF/context.xml
of your project. Most times you want to use a different database for
production. To overwrite the database used by your application you have to
define the datasource in the context.xml found in the conf
folder of your Tomcat. For our example, we should edit tomcat-9.0.64/conf/context.xml
and leave it in this way:
<?xml version="1.0" encoding="UTF-8"?>

<!-- The contents of this file will be loaded for each web application -->
<Context>

    <!-- Default set of monitored resources. If one of these changes, the    -->
    <!-- web application will be reloaded.                                   -->
    <WatchedResource>WEB-INF/web.xml</WatchedResource>
    <WatchedResource>WEB-INF/tomcat-web.xml</WatchedResource>
    <WatchedResource>${catalina.base}/conf/web.xml</WatchedResource>

    <!-- Uncomment this to disable session persistence across Tomcat restarts -->
    <!--
    <Manager pathname="" />
    -->

	 <Resource name="jdbc/invoicingDS" auth="Container" type="javax.sql.DataSource"
	      maxTotal="20" maxIdle="5" maxWaitMillis="10000"
	      username="invoicing" password="sfh4tjdl" driverClassName="org.hsqldb.jdbcDriver"
	      url="jdbc:hsqldb:hsql://localhost:1999"/>

</Context>
We use invoicingDS as
datasource name, the same of the context.xml included in your WAR,
but we define different url, username and password.